Introduction
Creating clean and efficient UV maps is a crucial part of any 3D texturing workflow, especially when working on models for games like Minecraft. Blockbench UV mapping enables creators to control how textures are wrapped around their 3D models. For faster results, many turn to the Blockbench Auto UV feature, which simplifies the unwrapping process by automatically generating UV coordinates based on the model’s geometry.
Importance of Fast and Clean UV Mapping in 3D Workflows
In 3D modeling especially for game development and low-poly assets, UV mapping is the backbone of accurate and efficient texture application. Clean UV maps prevent texture stretching, maintain clarity, and ensure that textures behave as expected across different faces. Speed also plays a significant role in asset pipelines. With tools like Blockbench UV mapping, artists can quickly unwrap models while preserving quality, enabling faster iterations and better control over the final visual output.
Role of Auto UV in Improving Efficiency in Blockbench UV Mapping
Blockbench Auto UV is a powerful feature designed to simplify the unwrapping process. Instead of spending time marking seams or arranging UV islands by hand, Auto UV takes over and generates a ready-to-use layout in seconds. This is especially helpful when working with blocky, Minecraft-style models where texture uniformity is more important than detailed control.
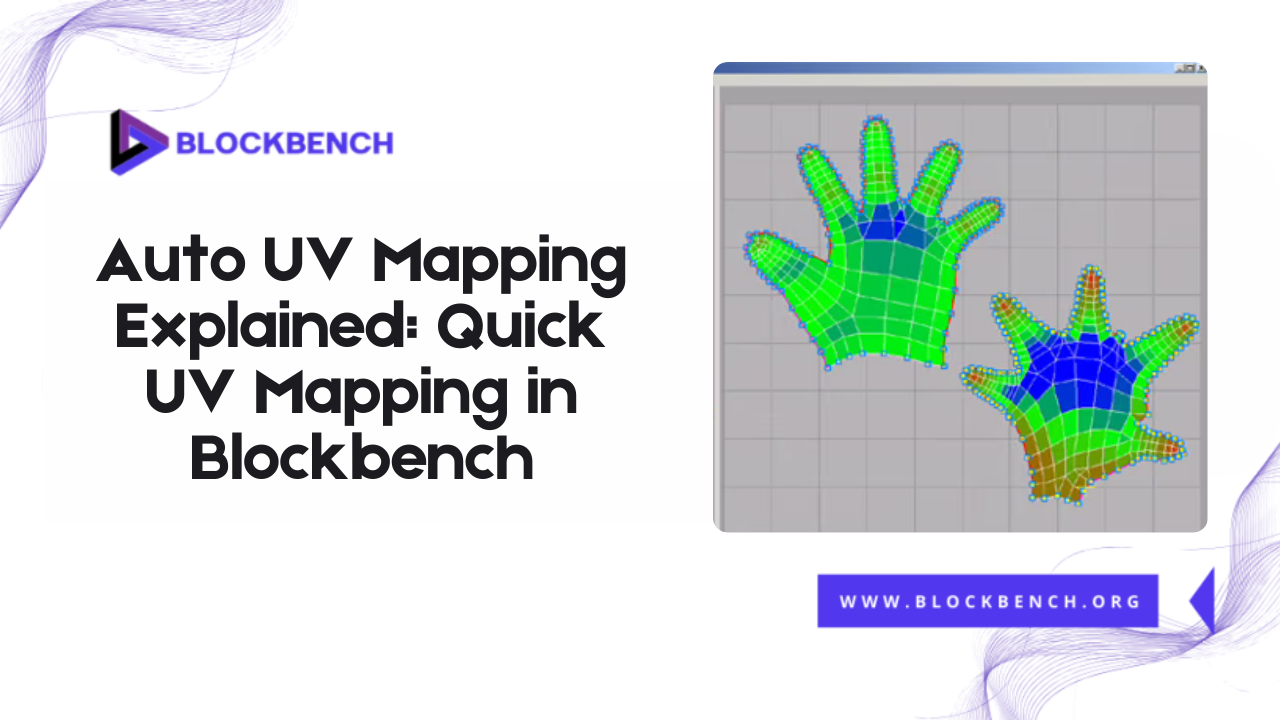
What Is Auto UV Mapping in Blockbench?
Auto UV Mapping in Blockbench is an automatic unwrapping feature that simplifies the process of laying out textures over 3D models. Rather than manually defining how each face interacts with the texture image, Blockbench Auto UV projects UVs based on the model’s shape, most often using a box projection method. This allows users to quickly generate consistent UV maps, ideal for voxel or cubic models standard in Minecraft.
Definition of Blockbench Auto UV
The Auto UV tool in Blockbench is a function in the UV Editor that automatically generates UV coordinates for selected parts of a model. It calculates the best way to map each face onto a 2D texture, aiming to minimize distortion and maximize texture coverage. This is especially useful for models with simple geometry or repeating textures.
How It Differs from Manual UV Unwrapping
Manual UV unwrapping involves placing seams, unfolding the model by hand, and organizing UV islands manually for precise texture control. While this method offers greater flexibility, it’s time-consuming and requires experience. In contrast, Blockbench Auto UV automates all of this. While it may not provide the same level of fine-tuned control, it’s perfect for simple models or when quick results are needed. The trade-off is speed versus customization.
Why Auto UV Is Useful for Minecraft and Low-Poly Models
Minecraft models and low-poly assets benefit greatly from Auto UV because of their geometric simplicity. Since most faces are flat and square, Auto UV in Blockbench can accurately align textures with minimal effort. This is especially helpful when working with tiles, repeated patterns, or pixel-art textures, which are common in Minecraft. Auto UV allows creators to focus on model design and texture painting without getting bogged down in technical UV layout details.
How Auto UV Works Inside the Blockbench UV Editor
The Auto UV feature in Blockbench integrates directly into the UV Editor. When enabled, it analyzes the model’s geometry and automatically places UV islands based on surface orientation. These islands are arranged in a way that minimizes overlap and maintains consistency in texture across all parts. The goal is to provide a clean, usable UV layout without manual input.
Step-by-Step Breakdown of How Blockbench Auto UV Processes Your Model
- Select Model or Cubes: Highlight the entire model or specific cubes in the Outliner.
- Activate Auto UV: Click the Auto UV button in the UV Editor toolbar.
- Auto Projection: Blockbench analyzes each face and applies a box projection UV map to it.
- Island Generation: UV islands are generated based on face groups and orientations.
- Automatic Layout: UVs are placed within the UV grid with consistent spacing.
- Real-Time Preview: Users can view the texture instantly in the 3D viewport.
Overview of Automated UV Island Generation
Once Auto UV is applied Blockbench UV mapping divides the model into UV islands which are flattened 2D representations of grouped faces. These islands are automatically positioned to avoid overlaps and maintain consistent scale. This automated generation ensures that the model can be painted or textured accurately without significant distortions. UV islands are substantial when working with detailed textures, as they control how each part of the model receives visual data.
Texture Alignment Behavior with Auto UV
A key strength of Auto UV in Blockbench is its smart texture alignment. By default, it aligns textures based on the orientation of each face, so the front of a cube aligns with the front of the texture and so on. This maintains a logical visual flow, especially important for grid-based or pixel-art textures. While some adjustments may be necessary for custom designs Auto UV provides a solid base layout that can be easily tweaked without starting from scratch.
Preparing Your Model for Auto UV in Blockbench
To get the best results from Auto UV mapping in Blockbench, preparing your model correctly is essential. Start by ensuring your model’s geometry is clean and simple, avoid overlapping faces or hidden geometry, as these can confuse the automatic UV generation and cause texture glitches. Organize your model parts logically grouping connected cubes or components to maintain texture consistency after auto-unwrapping.
Setting Up Model Geometry for Optimal Auto UV Results
A well-prepared model maximizes the accuracy of Auto UV. Make sure faces are correctly aligned, and remove any unnecessary hidden polygons that won’t be visible in the final render. Overlapping geometry can result in overlapping UV islands, which cause texture conflicts. Simplify complex models by breaking them down into smaller parts, if necessary.
Avoiding Hidden Geometry or Overlapping Faces
Hidden geometry and overlapping faces are common pitfalls before running Auto UV. These issues cause multiple surfaces to share the same UV space, leading to texture bleeding or artifacts. In Blockbench, use the visibility toggles and the geometry cleaning tools to isolate and remove hidden or duplicate faces. Before applying Auto UV, double-check your model’s mesh integrity to avoid texture misalignment and maintain clean UV layouts.
Tips for Organizing Parts Before Applying Auto UV
Organizing your model’s parts improves the Auto UV process. Group related cubes or sections that share textures to ensure their UV islands are logically positioned. Use the Outliner to rename and categorize parts by function or location. This organization helps when making manual adjustments later or when exporting UV layouts for texture painting. Keeping your model clean and structured is a vital step in achieving optimal Blockbench UV mapping results using Auto UV.
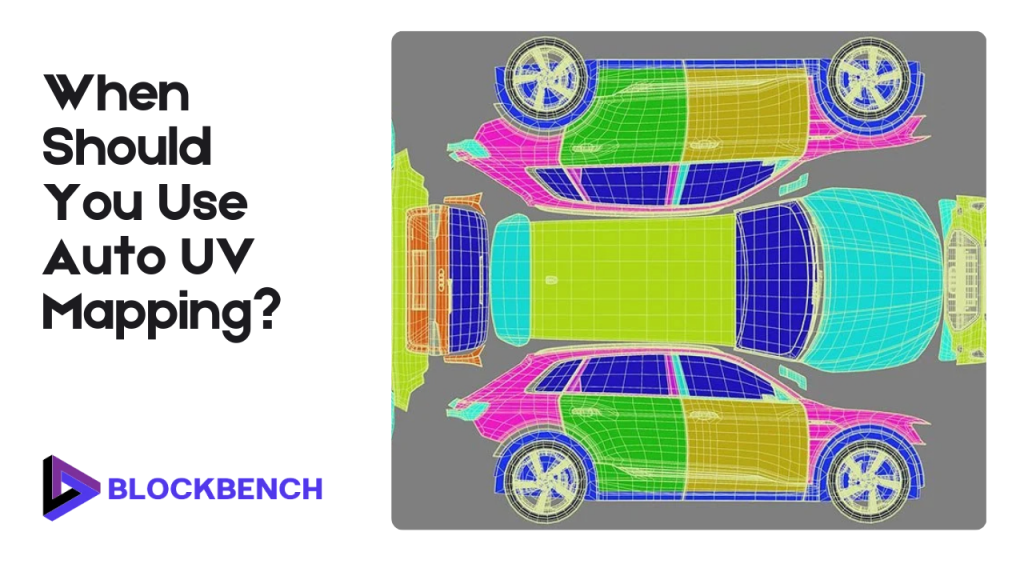
When Should You Use Auto UV Mapping?
Auto UV mapping in Blockbench shines when you need quick, reliable UV layouts without spending hours on manual unwrapping. It’s ideal for blocky Minecraft-style models, simple props, or early prototyping where speed takes precedence over intricate texture detail. Auto UV offers an outstanding balance between convenience and accuracy, especially for game developers and modders who work with repetitive or modular textures.
Ideal Scenarios and Model Types for Auto UV
Auto UV is best suited for models with simple regular geometry, thick cubes, rectangular prisms or low-poly objects typical in voxel art and Minecraft mods. Models where each face can share the same box projection texture benefit greatly. It’s less ideal for organic or highly complex models where detailed seam placement is necessary. Using Auto UV on the right model types ensures efficient texture workflows and reduces time wasted on manual corrections.
Speed vs. Control: Choosing Auto UV Over Manual Methods
Choosing between Auto UV and manual mapping depends on your priorities. Auto UV offers speed and automation, perfect for rapid iteration and simple models. Manual unwrapping provides control and precision, but it’s time-intensive. For many Minecraft creators, Auto UV offers sufficient power for creating clean textures while saving valuable development time.
Time-Saving Use Cases for Game Devs and Modders
Game developers and modders benefit from Auto UV’s time-saving features by speeding up asset creation without sacrificing texture clarity. When creating large numbers of blocky items, weapons or environmental elements Auto UV accelerates the UV mapping process. This lets artists focus more on texturing animation or gameplay.
Enhancing Auto UV Output with Manual Tweaks
While Auto UV provides a solid foundation, manual refinement is often necessary for polished results. After applying Auto UV, you can edit UV islands directly in Blockbench’s UV Editor to improve texture placement. Use seam marking tools to better control edge flow and fix alignment issues. Snapping and grid alignment help clean up island layouts preventing distortion.
Editing Auto UV Islands for Precision
After running Auto UV in Blockbench, the generated UV islands might not always align perfectly with your texture layout. To refine them, zoom into the UV Editor and manually adjust the size rotation or position of each island. This step is crucial for preventing stretched or squished textures especially on models that require detailed pattern placement or branding elements.
Using Seam Tools and Snapping After Auto UV
Even after applying Auto UV mapping in Blockbench, you can enhance the results by incorporating the Seam Tool. Marking seams manually after Auto UV allows you to split or reorganize specific UV islands that didn’t unwrap cleanly. This method is beneficial for complex or organic models, where automatic unwrapping may not generate optimal results.
Fixing Misalignments Caused by Automatic Unwrapping
Sometimes, Auto UV may cause overlapping or misaligned UVs. Manually move or resize these islands to eliminate overlaps and ensure continuous texture flow. This step is crucial for professional-grade Minecraft textures or game assets that demand visual polish.
Common Mistakes to Avoid with Auto UV in Blockbench
Common mistakes with Auto UV in Blockbench include overlapping UVs caused by poor model topology, which can result in texture glitches. Ignoring a consistent UV scale can make some parts of the texture appear stretched or blurry compared to others. Relying solely on Auto UV for complex models often leads to messy layouts and visible seams.
Overlapping UVs due to bad topology
One frequent mistake is applying Auto UV to models with overlapping or poorly arranged geometry. Overlapping faces cause UV islands to stack on each other, resulting in textures bleeding across multiple surfaces. Always clean up your model’s topology before using Blockbench Auto UV to ensure distinct UV islands and avoid texture conflicts.
Ignoring UV scale uniformity
Auto UV sometimes produces UV islands of inconsistent sizes. This leads to uneven texture resolution, where some areas appear stretched or pixelated. Always check and manually adjust the UV island scale in the Blockbench UV Editor to maintain uniform texture density across your model.
Depending solely on Auto UV for complex textures
While Auto UV is fast and convenient, relying on it exclusively for complex models can lead to visible seams, overlaps, or poor texture alignment. For intricate Minecraft textures or irregular shapes, combine Auto UV with manual seam marking and UV island editing for best results.
Exporting and Testing Auto UV Maps
Exporting your Auto UV maps from Blockbench is simple: save the UV layout as an image file to use in external programs like Photoshop or GIMP for detailed texture painting. After applying textures, always check the model in Blockbench’s preview mode to spot any stretching, seams or misalignment issues. It’s crucial to test your textured model in the target game engine such as Minecraft to ensure that textures display correctly under different lighting conditions and angles.
Exporting UV layouts for external software like Photoshop
You can export your UV layout from Blockbench as an image file (PNG or SVG). This layout serves as a guide when applying textures externally in software such as Photoshop or GIMP. Ensure your UVs are clean and well-organized before exporting, so texture artists can accurately map designs to the model.
Checking for clean texture application in Blockbench preview
After completing your Blockbench Auto UV process and applying textures, it’s crucial to inspect your model using the built-in preview mode. This tool enables you to view how textures are mapped onto the model in real-time, helping you identify problems such as stretching, misaligned seams, or overlapping UVs. Carefully rotate and zoom in on your model from different angles to spot any issues early.
In-game testing tips for Minecraft and similar engines
Finally import your textured model into Minecraft or your target engine to verify texture accuracy under different lighting and angles. In-game testing reveals if seams are visible or textures distort, enabling further UV adjustments if necessary.
Pro Tips for Mastering Auto UV in Blockbench
To master Auto UV in Blockbench, start by combining it with texture paint mode to quickly fix and refine textures directly on your model. Use checkerboard patterns to easily spot and correct UV stretching or distortion. Always clean up your UV islands by snapping them to the grid and aligning edges for a neat layout. Don’t rely solely on Auto UV; manually tweak seams and UV islands for the best results.
Combine Blockbench Auto UV with texture paint mode
Use Auto UV to generate quick UV layouts, then switch to Blockbench’s texture paint mode to directly paint or correct textures on the model. This workflow helps refine details and fix issues without leaving the software.
Use Checker Patterns for Distortion Detection
One of the most effective ways to check the accuracy of your Blockbench Auto UV mapping is by applying a checkerboard pattern. This visual aid helps you quickly spot areas where textures are stretched, squished, or misaligned. A perfectly mapped UV will display evenly spaced squares across the model. When irregularities appear, it’s a sign that your UV islands need adjustment.
Best Practices for UV Cleanup Before Exporting
Before exporting your texture or UV layout, it’s crucial to refine your Blockbench UV mapping for the best visual results. Start by organizing your UV islands, snapping the muse grid to align edges, removing overlapping areas, and ensuring uniform scaling. Clean UVs help avoid texture artifacts and make it easier to paint in external software, such as Photoshop or GIMP. You should also zoom in on edges and corners to make sure seams align cleanly.
Conclusion
Mastering Auto UV Mapping in Blockbench can significantly speed up your workflow while maintaining decent texture quality, especially for low-poly or straightforward models, such as those used in Minecraft. While Auto UV offers convenience, combining it with manual refinements ensures clean, professional results. Avoiding common mistakes and testing your UV maps thoroughly before final export is key to achieving seamless textures. With practice, you can make the most of Blockbench’s UV tools for efficient and accurate texture mapping.
FAQs
What’s the difference between Auto UV and Manual UV in Blockbench?
Auto UV automatically unwraps and aligns UV islands with minimal effort great for speed. Manual UV offers complete control, allowing for precision edits, making it ideal for complex textures or detailed models.
Is Auto UV accurate enough for Minecraft texture packs?
Yes, for most Minecraft-style blocky models, Auto UV provides clean usable layouts. However manual adjustments may be needed for detailed or seamless textures.
Can I edit UVs after using Auto UV?
Absolutely. After applying Auto UV you can manually move, scale, or align UV islands for better control and visual results.
Why does my texture look stretched after Auto UV?
Stretching usually happens when the model has uneven geometry or the UV islands aren’t scaled uniformly. Use the checker pattern and manually fix distortions.
How do I prevent overlapping UVs using Auto UV?
Ensure your model has no hidden or intersecting geometry and separate connected parts clearly before applying Auto UV. Use snapping and grid tools for adjustments.
Can I use external painting tools with Auto UV maps?
Yes, you can export the UV layout and paint textures in tools like Photoshop, GIMP, or Krita, then import them back into Blockbench.
Latest post:

Harold F. Rodriguez
Harold F. Rodriguez, the visionary mind behind blockbench.org, is a passionate and innovative individual dedicated to the world of technology. With a profound understanding of software development and a commitment to excellence, Harold has carved his niche in the digital realm. His journey is marked by a relentless pursuit of creating user-friendly solutions that redefine the landscape of online platforms. As the driving force behind blockbench.org, Harold continues to inspire and contribute to the ever-evolving tech community, leaving an indelible mark on the intersection of creativity and technology.