Introduction
In the world of Minecraft content creation, animation brings characters, mobs, and custom models to life. Whether you’re building a cinematic cutscene, an in-game animation, or just experimenting with custom rigs, mastering rigging is a crucial step. This is where tools like BlockBench come into play, making it easier than ever to design and animate Minecraft characters with precision.
Overview of Minecraft Animation Using Blockbench
Blockbench Minecraft has made creating animations for Minecraft characters more accessible than ever. Whether you’re building a simple idle loop or a full cinematic animation, Blockbench lets creators bring their blocky models to life.
Importance of Rigging for Character Movement and Animation
Rigging is the foundation of any animated model. Without a rig, your character model is just a static object. Rigging introduces bones and pivot points that define how parts of the model move, such as arms swinging, heads turning or legs walking.
What Is Rigging in Blockbench and Why Does It Matter?
Rigging in Blockbench Minecraft models refers to the process of creating a skeleton for your character or mob that defines how different parts of the model move. Just like learning how to change perspective in Minecraft gives players more control over gameplay, mastering rigging provides creators with greater flexibility in animation.
Definition and Purpose of Rigging in Minecraft Models
Rigging in Blockbench Minecraft models involves adding bones and joints to your character so you can animate them. These bones act like invisible levers that control how different parts of your model move during animation. It transforms your static creation into a dynamic character capable of complex motion.
How Rigging Improves Animation Control and Realism
Proper rigging ensures smoother transitions, realistic limb movements, and precise control during animation. Whether you’re creating a zombie walk cycle or a flying Ender Dragon, rigs allow for fine-tuned motion. This also saves time when animating because bones can be reused and mirrored across symmetrical parts of the model. Learning how to make Minecraft models in Blender helps you combine rigging, animation, and advanced rendering for professional-quality results.
Difference Between Static Models and Rigged Models
A static model is essentially a pose-frozen mesh; it can look detailed, but it won’t move. A rigged model, on the other hand, has embedded movement potential. Static models are ideal for decoration or display, while rigged models are essential for interactive content, mods, and cinematic animations.
Setting Up Blockbench for Animation Projects
Before diving into animation, it’s essential to properly set up your workspace in BlockBench to ensure a smooth and efficient animation workflow. Whether you’re animating simple blockbench Minecraft characters or working with detailed custom rigs, your setup will have a direct impact on the quality of your project. Start by downloading and installing the latest version of BlockBench from the official website.
Installing Blockbench and Selecting the Correct Minecraft Version
To get started, download the latest version of BlockBench from the official site. During setup, choose the correct Minecraft version: Java Edition or Bedrock Edition, as animation and model behavior can differ between the two.
Choosing the Right Model Format (Bedrock vs Java)
Blockbench vs Blender debates often mention format limitations, but choosing the correct format within Blockbench is just as important. Java models are typically used for modding, while Bedrock models are more suitable for the marketplace and cross-platform content. Java models use .json files, whereas Bedrock supports .geo.json files, which include rigging and animation data.
Recommended Settings for Animators
Before animating, ensure your project is set up for smooth rigging. Enable bone visuals in settings, adjust grid snapping for precise bone alignment, and use consistent naming conventions for all parts and bones. This keeps your rig clean and easy to manage as your animation grows.
Understanding the Rigging Interface in Blockbench
The rigging interface in BlockBench is explicitly designed with Minecraft-style models in mind, making it intuitive and beginner-friendly. If you’re working on blockbench Minecraft characters or mobs, understanding this interface is crucial for creating smooth, controllable animations. At the core of the interface is the Outliner. This panel visually displays all your model’s elements, including cubes, groups, and, most importantly bones in a clear hierarchy.
Introduction to the Outliner and Bone Hierarchy
The Outliner is where you manage the structure of your model. Here, bones are listed in a hierarchical format, where parent bones affect their child bones. This makes it easy to rig complex characters with multiple moving parts while maintaining complete control over each limb.
How the Pivot Tool Works
The Pivot tool lets you define where each bone or part rotates from. For example, arms should pivot at the shoulder, and legs at the hips. Proper pivot placement is crucial for achieving a natural-looking animation, as it avoids unrealistic twisting or floating parts during motion.
Layering and Organizing Your Model for Animation
To keep your workflow efficient, layer your model’s components logically. Group similar parts (e.g., arms, legs, head) and attach them to corresponding bones. This makes it easier to navigate the model in the timeline and ensures cleaner animations when previewing or exporting.
Creating Bones and Hierarchies in Blockbench
Rigging your blockbench Minecraft models begins with creating a bone structure that mimics the skeleton of your character. In Blockbench, adding bones is intuitive and essential for bringing your models to life with smooth animations.
How to Add Bones to Minecraft Models
Start by switching to the Rigging workspace in Blockbench. Here, you can insert bones by placing them inside your model’s geometry, usually at joints like elbows, knees, or the neck. These bones serve as pivot points that control the movement and rotation of the connected parts. Adding bones carefully ensures that your character animates naturally and without distortion.
Connecting Model Parts to Bones
After creating bones, the next step is to link your model’s parts, such as arms, legs, or head, to the corresponding bones. This process, known as weighting or bone assignment, tells Blockbench which parts should move when a specific bone is rotated. Properly connecting parts to bones is critical for preventing unwanted stretching or breaking during animation.
Best Practices for Naming and Grouping Bones
Maintaining a clear and consistent naming system for your bones helps you stay organized, especially in complex rigs. Use descriptive names like right_arm or left_leg to easily identify each bone. Group related bones in hierarchies to reflect genuine joint relationships. For example, fingers should be children of the hand bone. This structure simplifies animation and troubleshooting, making your rig more manageable and efficient.
Animating Minecraft Characters in Blockbench
Once your bones are set up and connected you can start bringing your Blockbench Minecraft characters to life using the animation tools within Blockbench.
Timeline and Keyframe Tools Explained
Blockbench features a user-friendly timeline that allows you to create keyframes to define specific poses at various points in time. By adjusting the bones’ positions and rotations on these keyframes, you craft the motion path your character will follow. Smooth animations result from carefully spacing these keyframes and adjusting the transitions.
Setting Up Idle, Walk, and Action Animations
Typical Minecraft characters require standard animations, such as idle breathing, walking cycles, and attack moves. Begin by creating a base pose idle then add additional keyframes for walking steps or swings. Looping these animations seamlessly is possible by matching the start and end keyframes of each animation. Blockbench allows you to preview these animations in real-time, ensuring fluidity.
Previewing and Refining Motion in Real Time
- Preview Rigged Movements: See exactly how your model moves in real time.
- Identify Issues: Spot unnatural bending, clipping, or motion errors.
- Refine Animations: Adjust bone weights or keyframes to fix problems.
- Polished Results: Ensures Minecraft-style animations look great in-game and when exported to Blender for advanced editing.
Using Blockbench Minecraft Models in Animation Pipelines
When working with blockbench Minecraft models, knowing how to export and integrate your creations smoothly into Minecraft or other animation tools is essential for a professional workflow.
Exporting Animated Models for Use in Minecraft (Bedrock or Modded Java)
Blockbench supports exporting models and animations in formats compatible with Minecraft Bedrock Edition and modded Java Edition. The most common formats include .json for Bedrock models and .java or .obj for Java mods. Be sure to select the correct export settings to preserve animations and bone data, ensuring your rigged characters function as intended within the game.
File Formats and Compatibility Tips
Choosing the correct file format is crucial. .glTF is widely preferred for animation and Blender compatibility due to its efficient support for textures and animations. Alternatively, .OBJ files work well for static models but lack animation data. Exporting with proper scale and pivot points ensures seamless integration, particularly when transferring models between
Blockbench and Blender or vice versa.
Transitioning from Blockbench to Blender for Advanced Rendering
- Blockbench Strengths: Ideal for Minecraft-specific modeling and rigging, featuring simple and intuitive tools.
- Blender Advantages: Offers complex animation features, high-quality rendering, and advanced editing.
- Export Options: Save your Blockbench Minecraft models as .glTF or.OBJ files.
- Import to Blender: Use compatible plugins to bring your models into Blender.
- Creative Benefits: Unlock advanced lighting, physics simulations, and cinematic effects beyond Minecraft’s native engine.
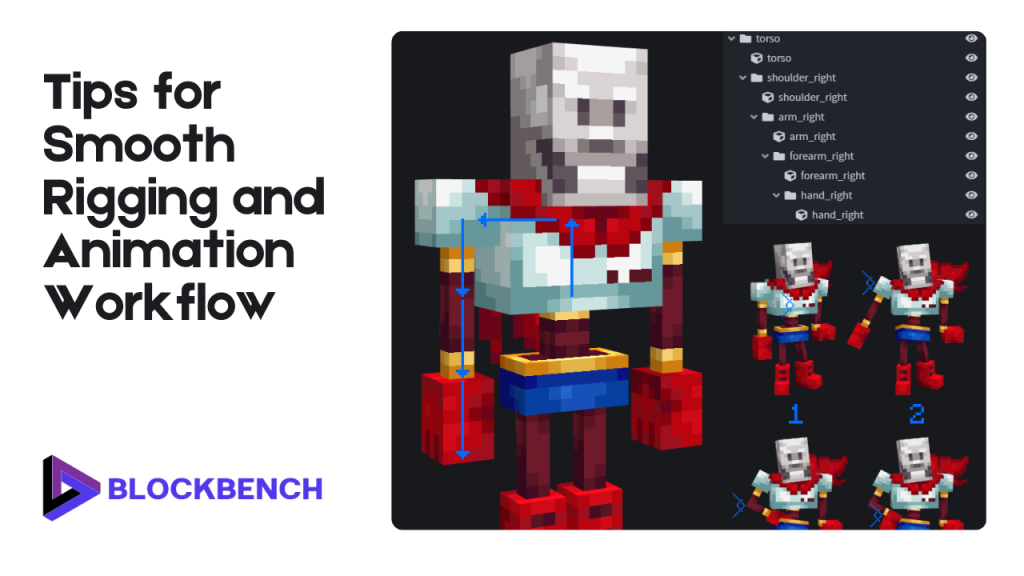
Tips for Smooth Rigging and Animation Workflow
Achieving smooth and efficient rigging and animation with blockbench Minecraft models requires attention to detail and innovative workflow practices. Whether you’re a beginner or experienced creator, following these tips will help you avoid common pitfalls and produce high-quality Minecraft animations faster.
Common Rigging Mistakes and How to Avoid Them
One frequent issue is improperly assigning bones to model parts, which can cause mesh deformation or glitchy movement. Double-check bone weights and ensure all model pieces are correctly linked. Avoid overlapping bones or redundant hierarchies, which complicate animation and cause errors during export.
Best Practices for Clean Bone Structures
Maintain an organized bone hierarchy with clear, descriptive names and consistent parent-child relationships. This clarity is invaluable when adjusting animations or troubleshooting rig issues. Keep bones to a minimum necessary for the desired motion to optimize performance without sacrificing flexibility.
Optimizing Performance for Larger Characters or Mobs
For complex or large Minecraft models, simplify rigs where possible and minimize texture resolution to reduce lag during animation playback or in-game rendering. Utilize efficient bone constraints and minimize excessive keyframes to maintain smooth and manageable animations.
Blockbench vs Blender for Minecraft Animations
Understanding the strengths and ideal use cases for Blockbench and Blender helps you determine which tool best suits your Minecraft animation needs.
Feature Comparison: Which Tool to Use and When
Blockbench is tailored for Minecraft, offering easy-to-use modeling rigging, and basic animation tools designed for the game’s blocky style. Blender on the other hand provides a full-featured 3D suite with advanced rigging, sculpting, and rendering capabilities. Use Blockbench for quick Minecraft model creation and Blender for complex animations or cinematic projects.
How Blockbench Minecraft Models Integrate into Blender
Thanks to export formats like .glTF, Blockbench Minecraft models can be smoothly imported into Blender while preserving textures and rigging data. In the same way that learning how to change POV in Minecraft gives players more flexibility during gameplay, knowing how to make Minecraft models empowers creators to have complete control over both design and presentation.
Workflow Suggestions for Using Both Tools Together
A popular workflow begins with designing and rigging in Blockbench, exporting animated models in .glTF, and then refining animations, adding effects, and rendering in Blender. This approach leverages the strengths of both platforms making it easier to produce high-quality Minecraft animations without compromising on style or detail.
Conclusion
Mastering rigging and animation with blockbench Minecraft models opens up a world of creative possibilities for Minecraft creators. Whether you’re crafting simple character movements or complex cinematic sequences, understanding how to efficiently use Blockbench’s rigging tools is key to producing smooth engaging animations.
While Blockbench offers a user-friendly Minecraft-focused environment for modeling and rigging, combining it with Blender can take your projects to the next level through advanced animation and rendering features.
FAQs
Can I animate Java Edition Minecraft models in Blockbench?
Yes, Blockbench supports both Java and Bedrock Minecraft models. However some features and export options may differ depending on the edition you choose for your project.
What’s the difference between pivot points and bones in Blockbench?
Pivot points control the rotation origin of individual model parts, while bones act as a whole skeleton structure for animating multiple connected parts smoothly in Blockbench.
How do I export animations from Blockbench to Minecraft?
Export your animated model in the correct format usually .json for Bedrock or .java for modded Java and ensure animations and rigging are properly baked before importing into Minecraft.
Do I need coding to rig characters in Blockbench?
No coding skills are required to rig characters in Blockbench; its intuitive interface allows you to create bones and assign them to model parts visually without the need for programming.
Is Blockbench good enough for professional Minecraft animations?
Blockbench is excellent for Minecraft-specific modeling and basic animations, but for more advanced rigs and rendering, combining it with Blender is often recommended.
Can I use Blockbench Minecraft models in Blender with animations intact?
Yes, by exporting your models in formats like .glTF, you can import Blockbench Minecraft models into Blender while preserving rigging and animations for further editing.
How do I avoid broken rigs or glitches during animation?
Maintain clean bone hierarchies, assign weights carefully, and test animations regularly in Blockbench to prevent rigging errors and glitches in your Minecraft models.
What’s better for complex animation: Blockbench vs Blender?
Blockbench is best suited for Minecraft-specific simple animations while Blender offers powerful tools for creating complex rigs, detailed animations, and professional-grade rendering.
Latest post:
- Blockbench to Blender Workflow: How to Import, Modify, and Render Minecraft
- How To Transfer My Domain From Eco-web Hosting To Lifetime hosting?
- Where Do You Start If You Don’t Know Minecraft Modeling?
- Auto UV Mapping Explained: Quick UV Mapping in BlockbenchAuto UV MappingAuto UV Mapping Explained: Quick UV Mapping in Blockbench
- Blockbench Rigging Explained: How To Animate Minecraft Characters

Harold F. Rodriguez
Harold F. Rodriguez, the visionary mind behind blockbench.org, is a passionate and innovative individual dedicated to the world of technology. With a profound understanding of software development and a commitment to excellence, Harold has carved his niche in the digital realm. His journey is marked by a relentless pursuit of creating user-friendly solutions that redefine the landscape of online platforms. As the driving force behind blockbench.org, Harold continues to inspire and contribute to the ever-evolving tech community, leaving an indelible mark on the intersection of creativity and technology.